

If you’ve unzipped your tent after a rainy night to find a wet sleeping bag, or you’ve woken up to the fly sagging and dripping onto you even though it’s not actively storming, your tent has a specific problem — and it’s probably not the one you think. Learning how to waterproof a tent gets treated online like it’s one job with one spray bottle, but there are at least six distinct things that cause a “leaky” tent, and a DWR spray only fixes one or two of them. I’m Joseph, and after chasing down more tent leaks than I’d like to admit on family trips, the first thing I do now is figure out which failure I’m actually looking at before I buy anything.
This article contains affiliate links. If you purchase through these links, I may earn a small commission at no extra cost to you. My recommendations are based on personal experience and thorough testing. Read my full disclosure for details.
Quick answer: Here’s how to waterproof a tent the right way: diagnose which of six causes is actually happening before you spend money — worn DWR coating (water soaks in instead of beading), failed seam tape or sealer (leaks track in along the stitching), a breaking-down polyurethane coating (sticky, flaky, smells off), nylon fabric sagging when wet (a material property, not a leak), condensation getting mistaken for a leak, or a cheap tent that was never properly sealed at the factory. Diagnose which one you’ve got before you spend money — a spray bottle only solves two of these six problems.
How to Tell If Your Tent Actually Needs Waterproofing
Before you buy anything, figure out where the water’s coming from — it changes what you buy. Set the tent up dry and run a hose over it, or use a spray bottle if that’s what you’ve got. What happens next — and where — tells you which of six problems you’re dealing with.
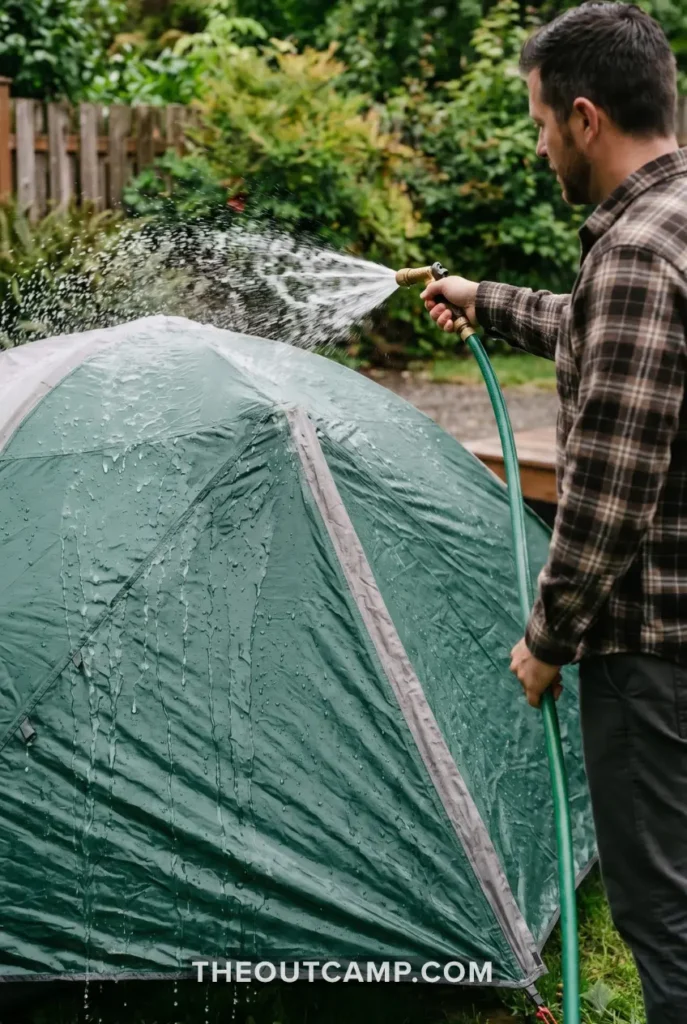
Water Soaks Into the Fabric Instead of Beading
This is DWR wear-out, the most common and easiest fix. The fabric darkens, feels heavier than it should, and rain stops rolling off in beads. It usually shows up after 1 to 3 seasons of use, sun exposure, or washing with the wrong soap (more on that below).
Leaks Track in Right Along the Stitching
This is seam tape or seam sealer failure, and it’s the single most common leak source overall. Water gets in through the needle holes left by stitching, and the factory tape or sealant over them wears out well before the fabric itself does. It tends to fail first at high-stress points — ridge seams, pole intersections, and guy-line attachment tabs — before it shows up anywhere else.
The Underside Feels Sticky or Flaky, or the Tent Smells Off Coming Out of Storage
This is polyurethane (PU) coating hydrolysis — the coating on the inside of the fly or floor physically breaking down. Beyond the stickiness and flaking, there’s usually a smell: most people describe it as stale gym bag, vinegar, or a musty locker-room odor. If your tent smells like that when you pull it out of the bag, that’s the coating breaking down, not dirt.
The Fly Sags, Wrinkles, and Drips Onto You Overnight — Without Active Rain
This isn’t a coating failure at all. Nylon absorbs moisture and physically expands when it’s wet or even just humid, which slackens the fly until it touches the inner tent and transfers water straight through. No amount of spray or sealer fixes this — it’s covered on its own further down.
It’s Wet Inside, But It Doesn’t Match Where the Rain’s Hitting
This is condensation, and it’s routinely mistaken for a leak. Cool nights, high humidity, and a tent zipped tight for warmth let moisture from breathing and gear condense on the inner walls and drip down — it looks and feels exactly like a leak.
The way to tell them apart: a true leak tracks in from one specific point (a seam, the floor, a spot on the fabric) and usually coincides with active rain. Condensation shows up as fine droplets spread across the whole inner ceiling or wall, often worst right after a cold night, rain or no rain. A fly that’s already wet out from failed DWR makes this worse, since the fabric breathes less well once the coating’s gone — see our guide on staying warm in a tent for the ventilation-versus-warmth trade-off that usually causes this.
A Brand-New Tent Leaks on the First Trip
This one isn’t a maintenance problem at all — it’s factory quality control. Tent waterproofness is measured by hydrostatic head (HH), the water pressure a fabric can hold before it leaks; a low or inconsistently applied HH coating means some tents leak in light rain right out of the box. This shows up most in no-name budget listings on Amazon and, occasionally, in the entry-level end of big-box brands like Coleman or Ozark Trail, usually as an unsealed or “inverted” floor corner weld that leaks first. If your tent does this brand-new, that’s a return or warranty conversation, not a reproofing project.
One more thing worth checking: zippers, stake-out points, and guy-line attachment tabs are all separate leak sources that have nothing to do with DWR, seams, or coating. A worn zipper flap or a stake point pulling away from its stitching usually just needs a local dab of seam sealer, not a full reproofing job.
Clean and Store the Tent Correctly
Get this part right first, because bad habits here cause half the problems above.
- Wash it right. Regular laundry detergent, dish soap, and OxiClean all strip DWR coatings in a single wash. Use a mild, fragrance-free, non-detergent soap, or a product actually made for tent fabric, rinsed thoroughly with a hose on low pressure.
- Never pack it away damp. Mold — not sun, not age — is the number one reason a decent tent gets thrown out early, and damp storage also speeds up PU coating hydrolysis. Let it dry completely, out of direct heat, before it goes back in the bag.
- Shake out the grit. Dirt and sand packed into folded fabric grind against the coating like sandpaper every time you compress and unpack the tent. Wipe it down before rolling it up, not just at the end of the season.
- Know your region. UV breaks down nylon and its coatings faster in intense sun — if you’re camping through Southwest deserts, Colorado, or California summers, expect faster wear than the same tent would see stored and used in the Northeast or Midwest. Pitching in some shade when you have the option adds real life to the fabric.
1. DWR Spray: How to Waterproof a Tent’s Rainfly
This fixes the rainfly and tent body when water’s soaking in instead of beading off. It’s a spray-on treatment, it’s the fastest of the three fixes, and it’s what most people mean when they say “waterproof my tent.”
What you’ll need: a DWR spray such as Nikwax Tent & Gear SolarProof, a garden hose or spray bottle, a clean cloth.
Steps
- Set the tent up (or lay the rainfly out flat) somewhere shaded — direct sun dries the spray too fast for it to bond evenly.
- Lightly wet the fabric with a hose or spray bottle first. Most DWR sprays, including Nikwax’s, are water-based and go on more evenly on damp fabric.
- Spray the DWR over the entire exterior in sections, so you don’t miss a strip or soak one spot twice.
- Wait about two minutes, then wipe off the excess with a clean, damp cloth — leaving it on too heavy dries into a hazy film.
- Let the tent dry fully, ideally a full day, before packing it away.
Once it’s dry, run water over it again. If it beads and rolls off, you’re done. Worth knowing: a wet-out fly doesn’t just leak, it also breathes less well, which is part of why a tent with failed DWR often feels more humid and condensation-prone even on dry nights.
Nikwax’s SolarProof spray is the one I’d point someone toward for a 3- or 4-year-old tent that’s otherwise in good shape — no flaking, no sticky spots, just water soaking in instead of beading. At REI it’s sitting around a 4.3 out of 5 across dozens of reviews, and the pattern in the feedback is pretty consistent: people restoring beading on old rainflies are happy with it, and it doubles as UV protection, which most silicone sprays don’t offer.
The honest caveat is that a handful of reviewers who used it during genuinely heavy, sustained storms still had water come through — which tracks, because DWR only stops surface soaking. If your tent is leaking through the fabric itself in a downpour, that’s usually the polyurethane coating failing underneath, not something a DWR spray touches.
2. Seam Sealing: How to Waterproof a Tent’s Stitching
This one’s for water that’s coming in specifically along the stitching, not through the fabric in general. Seam failure shows up two different ways, and they need two different fixes.
What you’ll need: rubbing alcohol, a clean rag, a seam sealer matched to your tent’s coating (most tents are polyurethane-coated, not silicone — check the tag if you’re not sure), and a pair of gloves.
If the Seam Tape Is Peeling
Factory heat-taped seams peel, crack, or flake into small plastic bits over time, and it usually starts at ridge seams, pole intersections, and guy-line attachment points — the spots that take the most stress. Peel back only what’s already lifting; going after tape that’s still stuck risks tearing the coating underneath it along with the tape. Don’t apply liquid sealer over tape that’s still lifting elsewhere on the same seam — it’ll keep peeling and take your new sealer with it. Either fully strip and reseal that section, or replace the tape with fresh seam tape using an iron on low heat over parchment or baking paper — go easy, since a too-hot iron will melt the fabric before it sets the tape.
Applying Liquid Sealer
- Set the tent up, or turn the fly inside out and lay it flat somewhere bright enough to actually see the seams — a lot of failing seams hide in shaded corners you’d otherwise miss.
- Wipe down each seam with rubbing alcohol on a rag to strip off dirt, oils, and any old sealant that’s already peeling.
- Apply the new sealer in a thin, even line directly over the stitching on the coated, inside-facing side of the fabric — sealing the outer, face side is a common mistake, and it won’t stop the leak either.
- If one seam is failing, the others from the same batch usually aren’t far behind — worth doing all of them while you’re set up rather than coming back to do one more next month.
- Let it cure completely before folding or packing. Check the label, but plan on overnight minimum — sealant applied too thick or packed before it’s fully cured will leave the tent stuck to itself next time you unpack it.
Match the chemistry. Most car-camping and family tents — including Coleman, Ozark Trail, and the mid-weight tents you’ll find at Walmart, Amazon, or REI — use a polyurethane coating and need a urethane-based sealer. If a tent feels slippery rather than plasticky on the inside, that’s a silicone-treated fabric instead, and it needs a silicone sealer — Gear Aid makes a separate version, Seam Grip SIL, for that. Check which one you’ve got before you buy; the wrong chemistry won’t bond, and you’ll be back here in a month.
Gear Aid’s Seam Grip WP is the one I’d hand to a family whose tent is under two years old and only leaking right at the stitch lines — that’s almost never a fabric problem, it’s just a seam that wasn’t taped well to begin with. Reviewers at Dick’s Sporting Goods and Walmart describe going from leaking seams every single trip to staying dry through multi-day, heavy rain after one application. The trade-off: it’s genuinely tacky and messy to work with — wear the gloves, don’t skip that part — and it has a strong odor, so do this outside or somewhere ventilated.
3. Polyurethane (PU) Coating Restoration
This is how you actually waterproof a tent when the problem is the floor or fly coating itself, not just the surface.
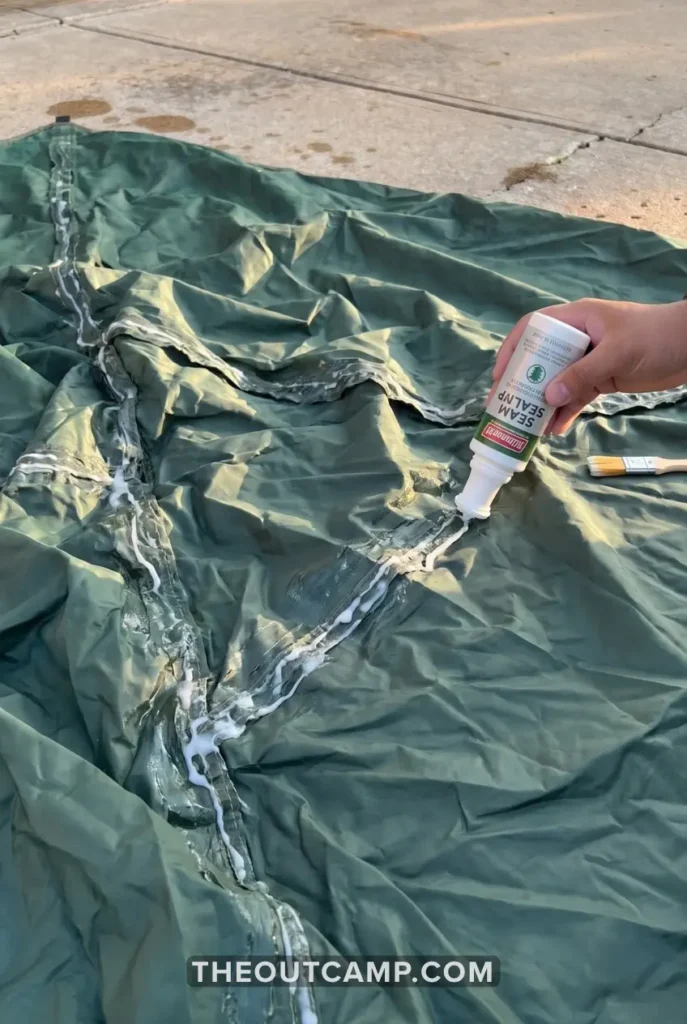
What you’ll need: an abrasive sponge or fine sandpaper, rubbing alcohol, a PU tent sealant such as Gear Aid’s Seam Grip TF (previously sold as Tent Sure), and a well-ventilated space.
Steps
- Lay the tent floor, or rainfly if that’s the part flaking, flat outside or in a garage, coating-side facing up.
- Gently scrub off any peeling or sticky old coating using the abrasive sponge and rubbing alcohol. Don’t skip this — new sealant won’t bond to flaking old coating, it’ll just sit on top of it.
- Apply a thin, even coat of the new sealant with the built-in foam applicator brush, working in sections so you can track what’s already covered.
- Let it dry for at least 24 hours in a ventilated space before folding the tent.
- Wash your hands and wipe down your tools before the sealant fully sets — it’s a lot easier to clean up wet than cured.
Know when to stop trying. Light flaking in isolated spots is genuinely worth recoating. Once the coating is peeling off in full sheets, or the fly’s stuck to itself, recoating is a temporary patch at best — that’s usually the point where replacing the tent makes more financial sense than fighting it every season.
This shows up most often on Coleman, Ozark Trail, and other budget-to-midweight family tents somewhere in year two to five, faster if the tent’s been stored damp or in a hot garage or car trunk, which is exactly why the storage section above matters.
The floor specifically wears out faster than the fly, and for two separate reasons. One is pressure — your body weight and gear grinding the coating from the inside, which typically shows up after 50 to 100 nights of use. The other is abrasion — rocks, roots, and rough ground wearing the coating from the outside. Either one can let water through with zero visible holes, which is why the floor deserves its own hose test even when the fly looks fine.
This is the fix I’d hand to someone whose sleeping bag keeps ending up damp at the foot of the tent even though nothing’s dripping from above — that’s ground moisture coming up through a compromised floor coating, not rain coming down. One honest flag: I wasn’t able to pull independent owner reviews specific to the current Seam Grip TF formula, so the coverage and cure-time specs above come from the manufacturer’s own product page — treat them as a starting point and confirm against the bottle you actually buy.
Why a Sagging, Dripping Fly Isn’t Always a Leak
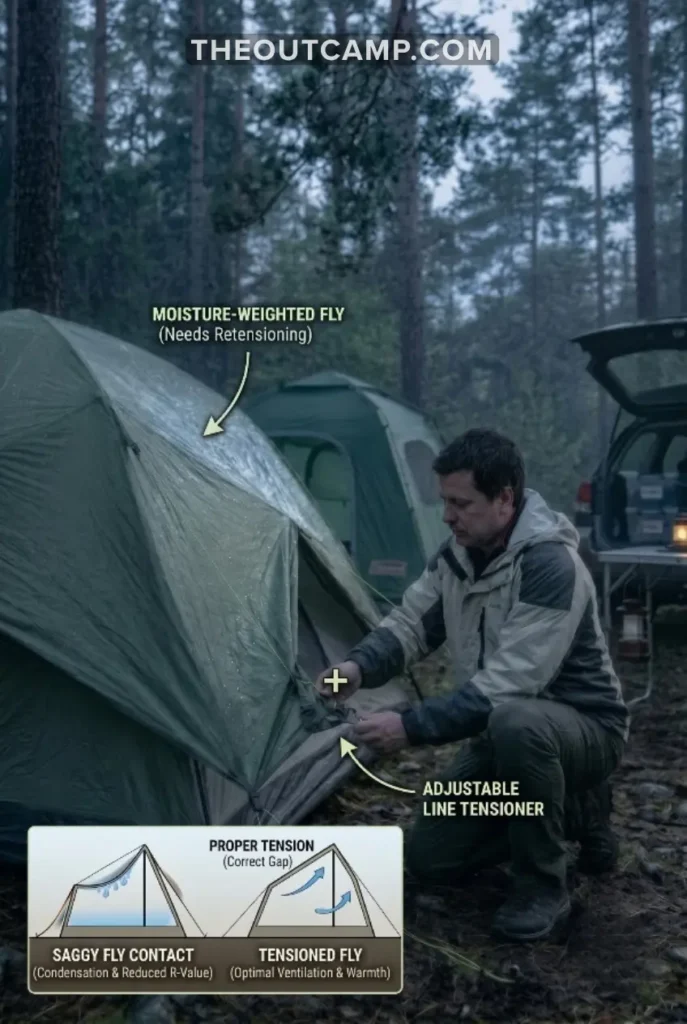
If your tent is nylon, this deserves its own explanation, because no spray or sealer fixes it. Nylon absorbs moisture and physically expands when it gets wet or even just humid — somewhere around 2 to 3.5%. On a single 10-foot fly panel, that’s 3 to 4 inches of extra fabric with nowhere to go.
It sags, wrinkles, and often droops down far enough to touch the inner tent wall, transferring rain or condensation straight through onto whoever’s underneath. On a large 4- to 6-person family tent, the total slack across the whole fly can add up to 6 to 8 inches, which is enough to turn a tight pitch into a saggy one by midnight.
Polyester barely moves — under 0.5% — which is part of why more midweight family tents have shifted to polyester flies over the last several years even though nylon is lighter and cheaper.
The fix isn’t a product, it’s technique: pitch the tent drum-tight while it’s dry, expecting it to loosen once it’s wet or the dew sets in, and be ready to get up and retension the guylines if you wake up to a sagging fly touching the inner tent. Adjustable line tensioners make that a 30-second fix instead of a full re-pitch. If this is a recurring annoyance on every rainy trip, it’s worth knowing before your next tent purchase — several picks in our best 4-person tent roundup use polyester flies specifically because they don’t do this.
4. Backup Waterproofing: Tarps and Footprints
Sometimes you don’t have time to reproof before a weekend trip, or you just want insurance on top of a repair you’re not 100% sure worked. A tarp rigged over the tent, or a footprint underneath it, isn’t a substitute for fixing the actual coating — but it buys you a dry night while you plan the real fix.
Pitch a waterproof tarp above the tent, angled so water runs off away from the entrance rather than pooling on top, and stake the corners down so wind doesn’t turn it into a sail. A footprint underneath protects the floor coating from rocks, sticks, and ground moisture, which slows down exactly the kind of abrasion covered above. If you’re setting up your site with a footprint and tarp system from scratch, our car camping setup guide covers how to lay all of it out before you’re doing it in the rain.
This is the move I’d make for a first-timer with a toddler and a light leak who doesn’t want to deal with sprays and brushes the night before a trip — get through this one with a tarp, then do the real fix at home when there’s no deadline.
My Honest Take
If I had to pick one thing people get wrong here, it’s assuming “waterproofing spray” fixes everything. It fixes one thing: the DWR coating on the outside of the fabric. It does nothing for seams and nothing for a failed PU coating, and I’ve seen people spray an entire tent down, get rained on again, and conclude the product doesn’t work — when really they just fixed the wrong problem.
If you’re on a tight budget, Kiwi Camp Dry is the cheap option you’ll see at Walmart, and it’s fine for light rain or dew on a tent that’s otherwise in decent shape. Just don’t expect it to hold up in a real storm — the honest reviews on it are pretty split, with some people getting a full season out of it and others getting soaked on the first heavy-rain trip. It’s water-resistant, not waterproof, and it says so on the can if you read the fine print.
And once a tent is stacking up more than one of these six problems — say, a failing coating that’s peeling in sheets, plus stiff, sun-brittle fabric — do the math on what you’re spending versus what a new tent costs. Mold and coating hydrolysis are the real killers, not age by itself, and no amount of reproofing fixes fabric that’s gone brittle from years of UV. If you’re at that point, it might be worth a look at our best 4-person tent picks instead of sinking another $40 into a tent on its last season.
That’s really the whole trick to how you waterproof a tent long-term — match the fix to the cause, not the cause to whatever’s on the shelf.
FAQ
How often do you need to waterproof a tent?
Most tents that see regular use need the DWR refreshed every season, roughly every 12–24 months. A tent stored dry between trips and kept out of direct sun can go longer. The water-bead test is more reliable than a calendar — if water’s still beading, don’t bother reapplying yet.
Can you re-waterproof a tent that isn’t leaking yet?
Yes, and it’s smart to. Refreshing the DWR coating before it fully fails is easier than restoring it after the tent’s already leaked through, and products like Nikwax’s SolarProof spray add UV protection at the same time, which slows the fabric degradation that eventually causes the floor coating to fail. This works the same way on a camping awning, if you’ve got one that’s started letting water through.
What’s the cheapest way to waterproof a tent?
A silicone-based spray like Kiwi Camp Dry, available at Walmart for under $15, is the budget option. It’s genuinely fine for light rain and morning dew. It’s not a substitute for seam sealing or a PU coating fix if those are the actual problem — see the diagnosis section above before you spend money on the wrong fix.
Can you waterproof a tent without a spray?
Yes. Seam sealer and PU floor coating are both brush-on products, not sprays, and they handle problems a DWR spray can’t fix anyway. If you don’t want to apply anything at all before a trip, a tarp pitched over the tent is a legitimate short-term workaround — just not a permanent one.
Can a brand-new tent leak right out of the box?
Yes, and it’s not something you fix with a spray or a sealer. A low or unevenly applied hydrostatic head (HH) coating means some tents, especially budget ones, leak in light rain from day one — usually at an unsealed floor corner weld. If that’s what’s happening on a tent you just bought, take it back for a return or warranty replacement instead of reproofing something that was never sealed correctly in the first place.
How to Waterproof a Tent: What to Do Right Now
Don’t buy a product yet. Set your tent up and run a hose over it first — that five-minute test tells you whether you need a spray, a sealer, a floor coating, or some combination of the three, and it’ll save you from buying the wrong thing. If you’re not sure a fix actually worked, test it again with the hose before you’re relying on it in an actual storm, not during one. And if the water test shows two or three problems at once on a tent that’s already a few seasons old, that’s your answer on whether to repair it or replace it.